Setup
Initial Configuration
After you build LoopFollow the first time, you are asked a few questions (your initial choices can always be modified later):
- Calendar Access: if you want to allow LoopFollow to provide real-time updates to carplay using the Calendar, choose Allow Full Access
- Bluetooth Access: if you want to use an expired Dexcom sensor or a spare RileyLink device to keep LoopFollow running in the background while your phone is locked, choose Allow
- Notifications: if you want LoopFollow to notify you for any of your alarms or if LoopFollow stops working, choose Allow
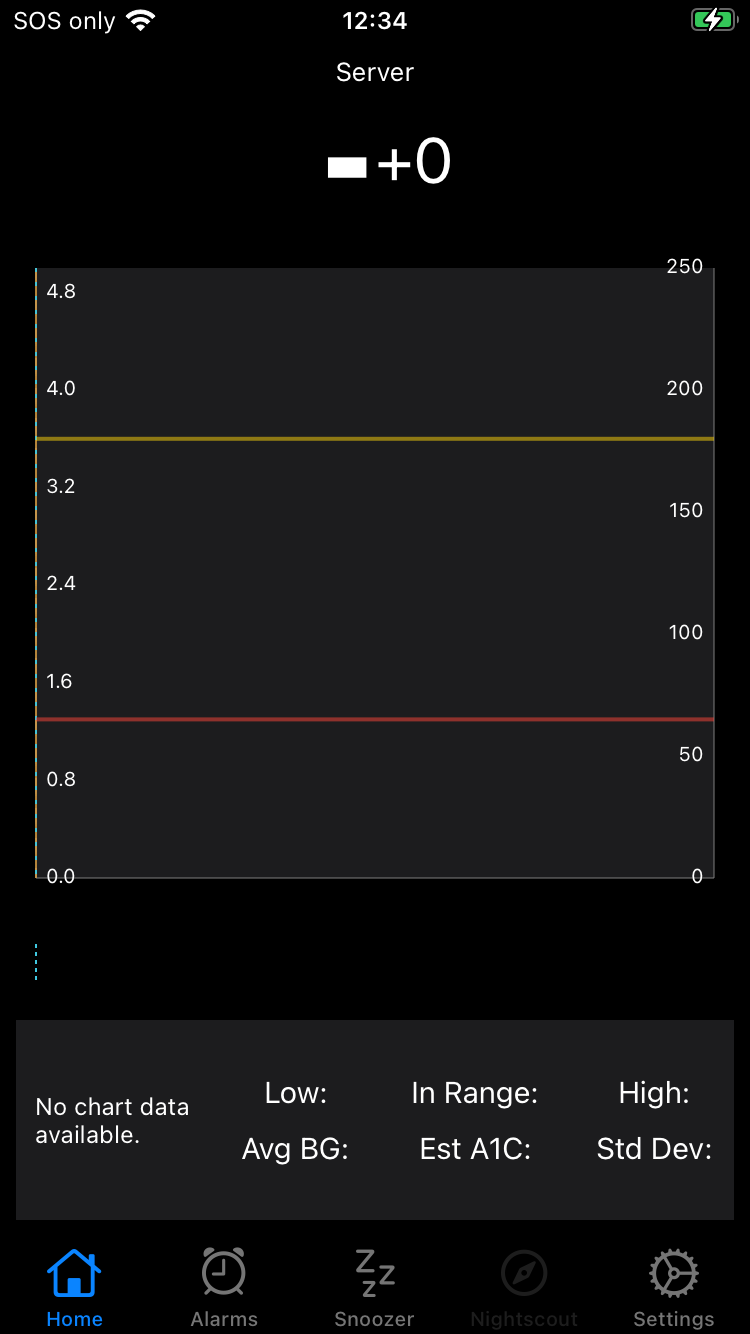
You will then be presented with a home screen as shown below.
Setup Your Data Source
Tap on the "Setup Nightscout" button or "Setup Dexcom Share" button to enter your credentials for your preferred service.
For more information about how to configure your data source, refer to these sections:
Once a Data Source is entered, you have access to a variety of LoopFollow features.
The default settings are a fine place to start. As you learn to use LoopFollow, you can explore the adjustable Settings and Features.
Home
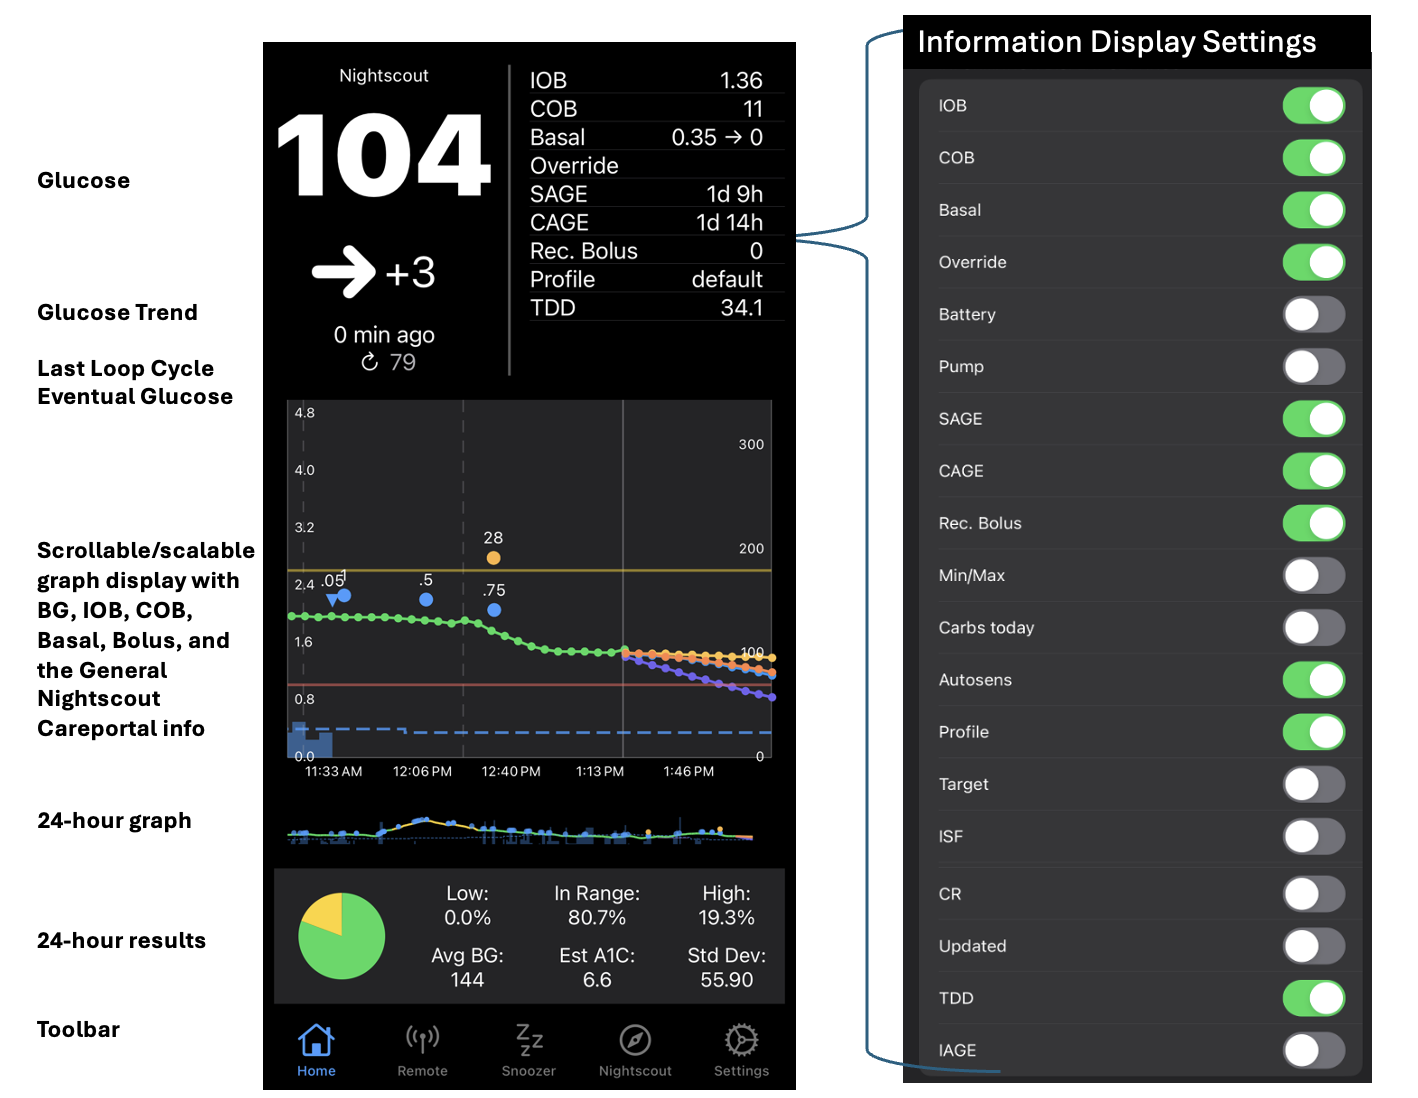
The home screen provides a dashboard of important information.
- Supports Glucose display when Dexcom is available but Nightscout is not
- Supports Information Display from Loop and Trio when Nightscout Site is provided
- Loop & Trio: common features like status, basal, bolus, carbs and eventual glucose forecast
- Loop: Loop specific features like Profile Name, remote control
- Trio: Trio specific features like Autosens, TDD, remote control (with Trio 0.5.x and newer)
Once you’ve configured your settings, your Home screen will look as beautiful as the example below!
Toolbar
The toolbar (tab bar) at the bottom of the Home and Menu screens is configurable using Settings: Tabs. Four icons are displayed at a time — choose from the options below. The features that can be selected are:
| Name | Description |
|---|---|
| Home | Plots and summary display |
| Alarms | Select and configure Alarms |
| Remote | Send remote commands to an OS-AID app (Loop or Trio), requires Nightscout and secure configuration |
| Nightscout | Display your Nightscout Site |
| Snoozer | Allows quick "snooze" of alarms, great screen for night use or monitoring |
| Treatments | Display Treatments, selectable by type |
| Statistics | Display Statistics for up to 90 days, requires Nightscout Site |
Menu Screen
The following graphic shows the menu screen. The menu can always be reached using the right button of the toolbar on the Home and Menu screens.
- The features on this screen are described on the LoopFollowDocs Features page
- Settings, Logging and Build Information are covered below
- Support & Community are discussed on the LoopFollowDocs home page

Settings Screen
The Settings Screen is accessed by tapping on the Menu icon and selecting the Settings row.
- The
Information DisplayandRemoterows are only available with Nightscout Credentials.

LoopFollow Data Source
Make sure you have access to the internet when filling out credentials.
You provide LoopFollow with information about the person you are following. At least one of these must be entered:
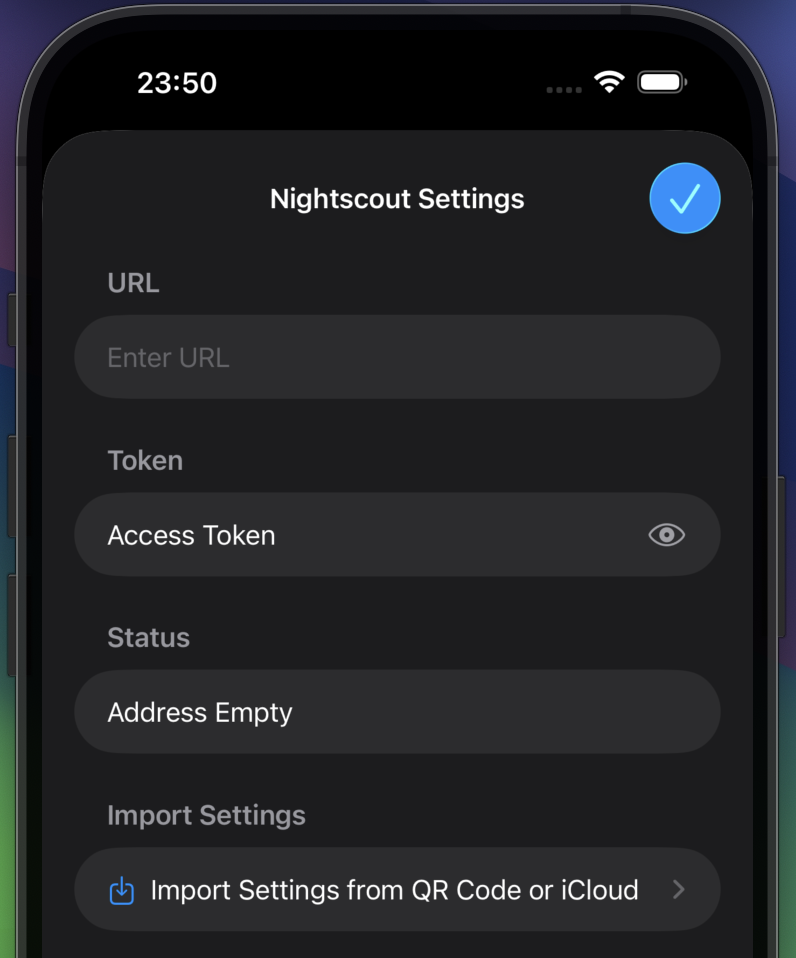
Setup Nightscout
The graphic below shows the display when you tap on the Nightscout row. For more information about tokens, keep reading the details below the graphic.
When adding the Nightscout information to monitor, you can copy your Nightscout URL (including the token) from the Admin Tools in Nightscout. When pasted into LoopFollow URL row, the app will automatically extract and fill in both the URL and token.
Setting up a second device
With version 4.3 and newer, You can set up a second device by scanning a QR code from another LoopFollow user. See this section Import/Export.
Nightscout Access
It is possible to have your Nightscout site readable by the world, in which case you do not need to add a token. If you choose to do that, just ignore references to entering the token. The status will show up as OK (Read).
For more information about tokens with Nightscout, refer to Admin Tools in Nightscout.
The type of token depends on the type of remote control desired. The table below indicates the minimum token access for each type of remote control available with LoopFollow. When you enter your credentials, LoopFollow tries to reach the site and then provides the status.
For a full summary of version requirements for Loop and Trio remote control, see Version Compatibility.
| LoopFollow Remote Type | Minimum Token Access | LoopFollow Status |
|---|---|---|
| None | Read | OK (Read) |
| Loop Remote Control | Read | OK (Read) |
| Trio Remote Control | Read | OK (Read) |
| Nightscout Trio 0.2 or older |
Read & Careportal | OK (Read & Write) |
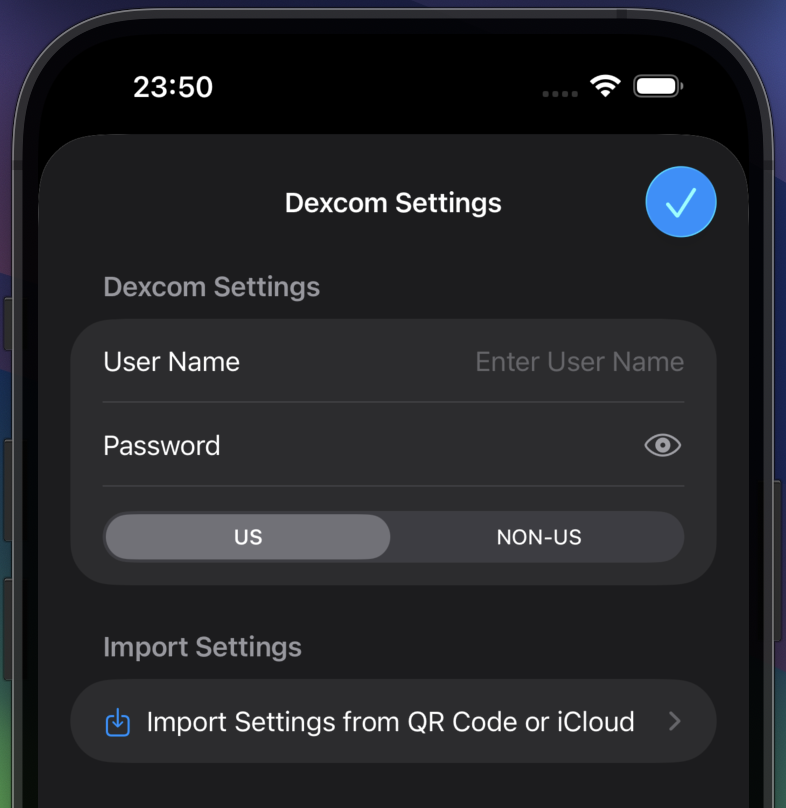
Setup Dexcom
The graphic below shows the display when you tap on the Dexcom row.
The Dexcom Share credentials are optional, but can be useful when the Nightscout URL is unavailable.
Setting up a second device
With version 4.3 and newer, You can set up a second device by scanning a QR code from another LoopFollow user. See this section Import/Export.
Display Settings
There are a number of display options the user can configure to customize the appearance of the plots, tables and navigation tabs. These are summarized in the table below along with quick links to a more detailed description.
- The
Information Displayrow is only displayed with Nightscout Credentials.
| Name | Description | Link |
|---|---|---|
| General | Adjust settings that affect the general app behavior | General |
| Graph | Adjust settings that affect the plots on the Home screen | Graph |
| Information Display | Select which items to display in the Home screen Information Table Requires Nightscout Data Source |
Information Display |
| Units and Metrics | Choose glucose unit, Time in Range mode, and how glycemic and variability metrics are reported | Units and Metrics |
| Tabs | Configure the toolbar displayed on the Home and Menu screens | Tabs |
App Settings
There are a number of application settings the user can configure. These are summarized in the table below along with quick links to a more detailed description.
- The
Remoterow is only displayed with Nightscout Credentials.
| Name | Description | Link |
|---|---|---|
| Background Refresh | Configure to keep LoopFollow always alive or allow it to sleep and thus conserve phone battery | Background Refresh |
| Import/Export | Share configurations among Caregiver phones | Import/Export |
| APN | Enter Apple Push Notification Credentials for Remote Control and Live Activity | APN |
| Live Activity | Enable and Configure Live Activity | Live Activity |
| Remote | Configure for secure remote control Requires Nightscout Data Source |
Remote Control Overview |
Other Settings
There are a few more sections on the Settings screen. These are summarized in the table below along with quick links to a more detailed description.
| Name | Description | Link |
|---|---|---|
| Alarms | Control overall alarm behavior; individual alarms are configured in the Alarms feature | Alarms |
| Calendar | Configure calendar updates for CarPlay | Calendar |
| Contact | Configure real-time glucose updates on Apple Watch | Contact |
| Advanced | Control which data is downloaded from Nightscout and adjust graph options | Advanced |
Settings Details
General
These settings are accessed through the General row in the Settings screen.
| Name | Description |
|---|---|
| Display App Badge | When enabled - current glucose is displayed with app icon - select a Background Refresh option or badge will be stale. |
| Persistent Notification | Typically disabled When enabled, glucose is reported with every update |
| Appearance | Choose Light, Dark or System for appearance |
| Display Stats | When enabled, statistics for the last 24 hours are displayed on Home screen |
| Display Small Graph | When enabled, a full history graph is displayed under the main plot. The history is determined by the Number of Days Back chosen in the Graph screen |
| Color BG Text | When enabled, use colors to highlight low, in-range and high values |
| Keep Screen Active | When enabled, override the auto-lock setting This works whether the phone is plugged in or not, so be sure to lock screen manually |
| Show Display Name | When enabled, the app name is shown on the Home screen Very useful if more than one person is being followed |
| Snoozer Emoji | When enabled, the snoozer screen shows emojis in addition to glucose values |
| Force Portrait Mode | When enabled, aspect ratio is not affected by phone orientation |
| Time Zone Override | When enabled, another row is displayed Select the time zone for the T1D who is being followed |
| Speak BG | When enabled, glucose is spoken aloud in selected language Options are available to limit this but see also Persistent Notification |
Graph
These settings are accessed through the Graph row in the Settings screen.
| Name | Description |
|---|---|
| Display Dots | Enable or Disable |
| Display Lines | Enable or Disable |
| Show DIA Lines | Enable or Disable |
| Show -30 min Line | Enable or Disable, with respect to carb entry |
| Show -90 min Line | Enable or Disable, with respect to carb entry |
| Show Midnight Lines | Enable or Disable |
| Show Calibration | Enable or Disable |
| Show Carb Absorption | Enable or Disable |
| Treatments on Small Graph | Enable or Disable |
| Height | Select height of small Graph |
| Hours of Prediction | Select prediction extent on main plot |
| Min Basal | clamp the minimum displayed range for basal rate plot |
| Min BG Scale | clamp the minimum displayed range for glucose scale |
| Show Days Back | Affects the small graph display and adjusts fetch from Nightscout Site |
Information Display
These items can be chosen for display on the Home screen. A Nightscout Site is required and must be accessible or the table is blank.
A lower case
loopis used to denote aclosed-loopcycle for bothTrioandLoop.
The order of rows in the Settings: Information Display screen is reflected in the Information Table on your Home screen.
- The order in the table below is the order in the LoopFollow code
- You can drag the rows up and down to suit your preferred order
| Name | Description | Loop / Trio / Both |
|---|---|---|
| IOB | Active Insulin, also known as Insulin on Board | Both |
| COB | Active Carbohydrates, also known as Carbs on Board | Both |
| Basal | Current Basal Rate running on the pump | Both |
| Override | Sensitivity (if not 100%) and Target (for Loop) Name (for Trio) |
Both |
| Battery | Battery level on the OS-AID Phone Trio indicates if currently plugged in |
Both |
| Pump | Reservoir Level | Both |
| Pump Battery | Battery level on pumps that report levels | Both |
| SAGE | Sensor Age | Both |
| CAGE | Cannula Age | Both |
| Rec. Bolus | Recommended bolus from last loop |
Both |
| Min/Max | Minimum and maximum values for glucose from current OS-AID forecast | Both |
| Carbs today | Total grams of Carbs since Midnight | Both |
| Autosens | Trio: autosens value |
Trio |
| Profile | Named ProfileLoop requires Profile Customization |
Both |
| Target | Correction Range used by OS-AID | Both |
| ISF | Insulin Sensitivity Factor in therapy settings with modification if appropriate | Both |
| CR | Carbohydrate Ratio in therapy settings with modification if appropriate | Both |
| Updated | Time of last loop |
Trio |
| TDD | Total Daily Dose in the last 24 hours | Trio |
| IAGE | Insulin Age | Both |
Units and Metrics
These settings are accessed through the Units and Metrics row in the Settings screen. They control how glucose is displayed throughout the app, the range used for Time in Range, and how long-term glycemic and variability metrics are reported.
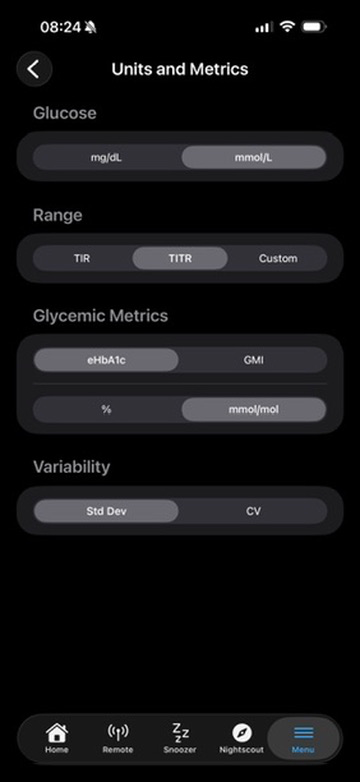
Glucose
Selects the unit used everywhere in LoopFollow for glucose values, target ranges and graphs.
| Option | Example reading |
|---|---|
mg/dL |
120 mg/dL |
mmol/L |
6.7 mmol/L |
The same reading is shown in either unit — switching the unit does not change any underlying data.
Range
Selects the Low and High thresholds that define your target interval. The percentage of readings within this interval is shown on the Home screen.
| Option | Name | Low – High |
|---|---|---|
TIR |
Time in Range | 70 – 180 mg/dL (3.9 – 10.0 mmol/L) |
TITR |
Time in Tighter Range | 70 – 140 mg/dL (3.9 – 7.8 mmol/L) |
Custom |
— | Values you enter below |
When Custom is selected, two extra rows appear — Low and High — entered in the glucose unit you chose above. These same Low and High values also drive the Low and High BG lines drawn on the main graph.
Glycemic Metrics
A long-term estimate of average glycemia, computed from the average glucose for the displayed period.
| Metric | What it is |
|---|---|
eHbA1c |
Estimated HbA1c, derived from average glucose using the ADAG-style formula |
GMI |
Glucose Management Indicator, derived from average CGM glucose |
Either metric can be reported in:
%— for example7.0 %mmol/mol— for example53 mmol/mol
Example values for three different average glucose levels:
| Mean glucose | eHbA1c (%) | GMI (%) | eHbA1c (mmol/mol) | GMI (mmol/mol) |
|---|---|---|---|---|
| 120 mg/dL / 6.7 mmol/L | 5.8 | 6.2 | 40 | 44 |
| 154 mg/dL / 8.6 mmol/L | 7.0 | 7.0 | 53 | 53 |
| 180 mg/dL / 10.0 mmol/L | 7.9 | 7.6 | 63 | 60 |
Variability
Selects how variability of glucose is reported.
| Option | What it is | Example |
|---|---|---|
Std Dev |
Standard deviation of glucose, in the selected glucose unit | 40 mg/dL or 2.2 mmol/L |
CV |
Coefficient of Variation — standard deviation divided by mean glucose, expressed as a percent | 35 % |
CV is reported as a percentage and is independent of the glucose unit.
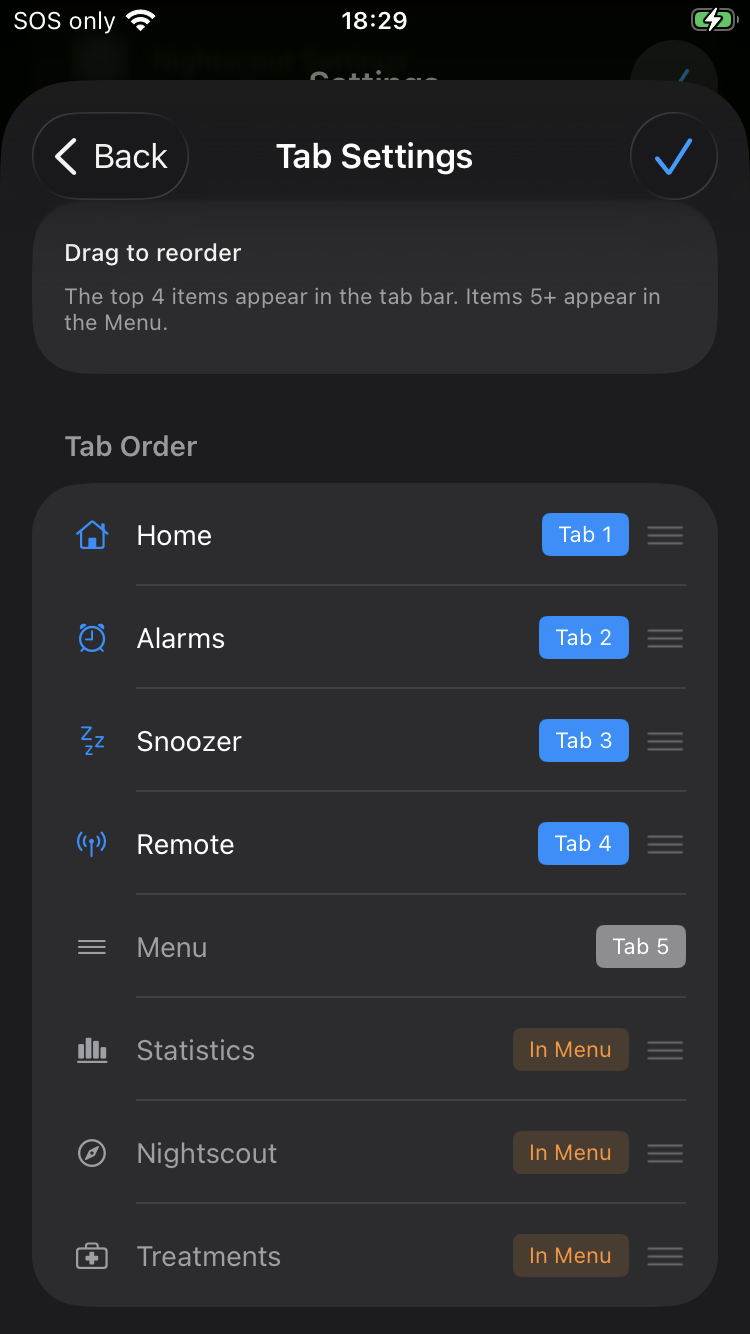
Tabs
The user can modify which icons are displayed in the task bar at the bottom of the screen.
In the Settings screen, select Tabs. Drag any of the options up or down to your preferred configuration.
Background Refresh
There are several options for keeping LoopFollow up to date. If you rely on LoopFollow Alarms or Live Activity, you must configure a Background Refresh setting.
For more information, see Background Refresh.
Import/Export
When setting up LoopFollow for another caregiver that will use some or all of the same configuration settings, you can export or scan a QR code to transfer settings between phones.
- Nightscout Site and token
- Dexcom Share
- Remote Configuration
- Alarms
QR Codes Contain Secret Information
Never share a QR code as a screenshot online or send it to someone that is not supposed to have access to your looper's information.
In particular, only share a remote configuration QR code with a caregiver authorized and trained to send remote control commands to the looper's phone!
If in doubt, you can revoke access to the APNS key at https://developer.apple.com/account/resources/authkeys/list
Export Settings
To export settings, select one of the options for
- Export Nightscout Settings
- Export Dexcom Share Settings
- Export Remote Settings
- Export Alarm Settings
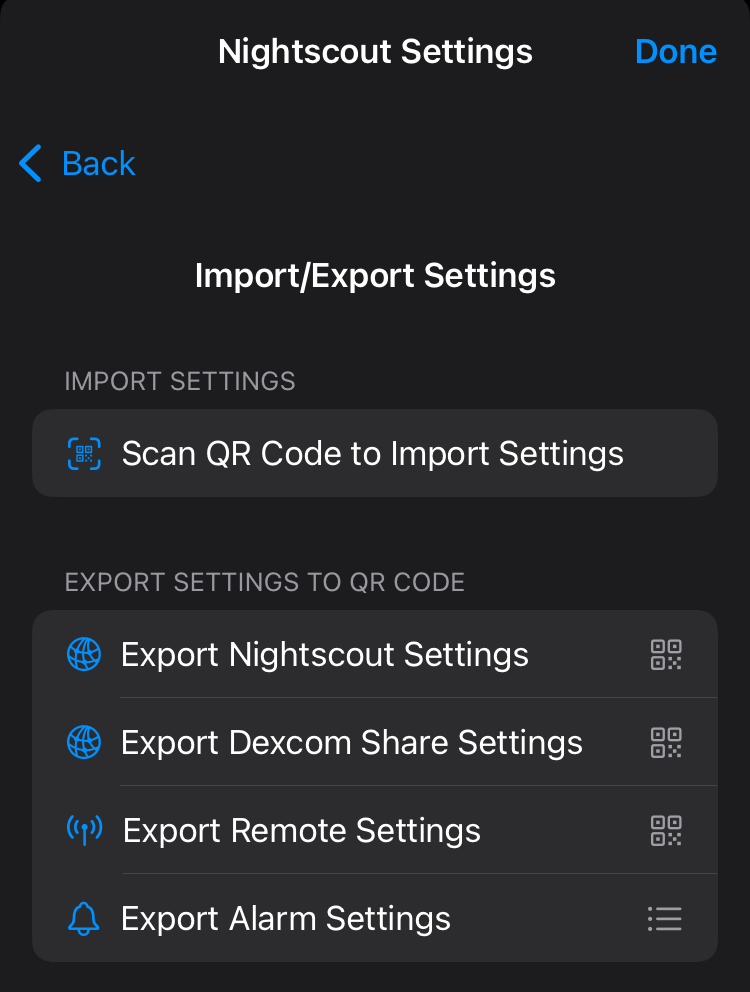
Export Nightscout Settings, Export Dexcom Share Settings and Export Remote Settings will show a QR code directly that you can scan with the receiving phone.
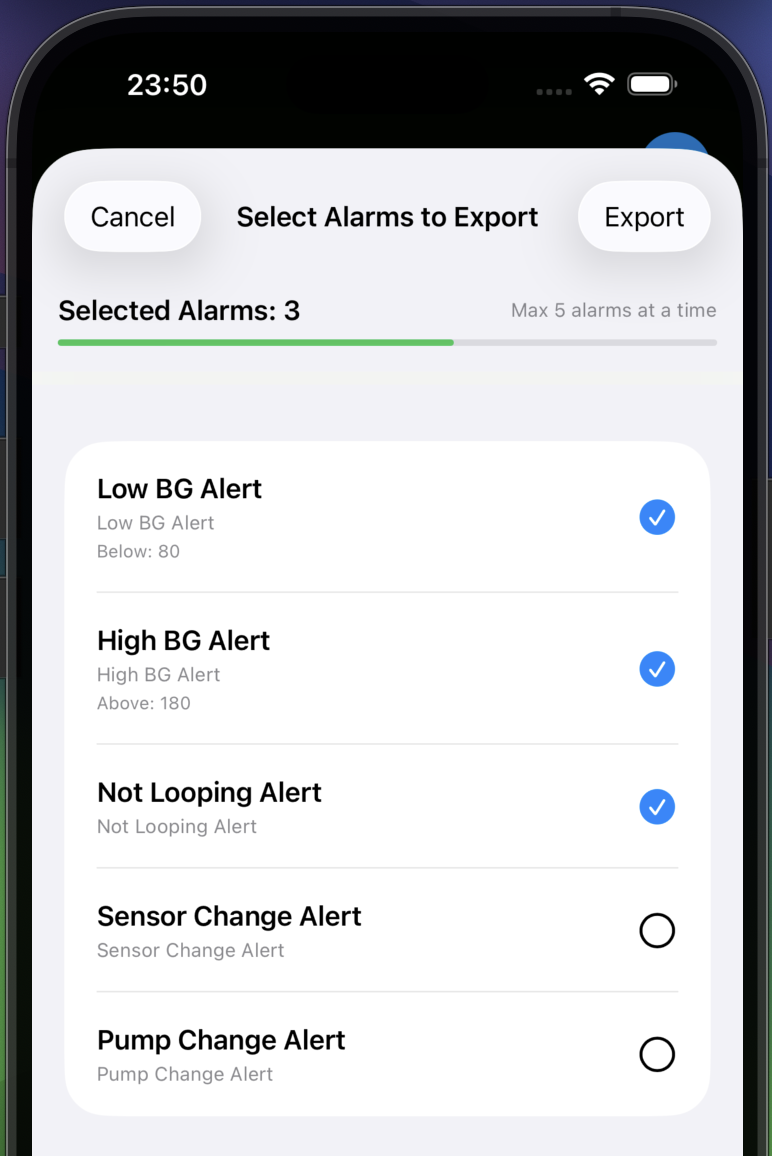
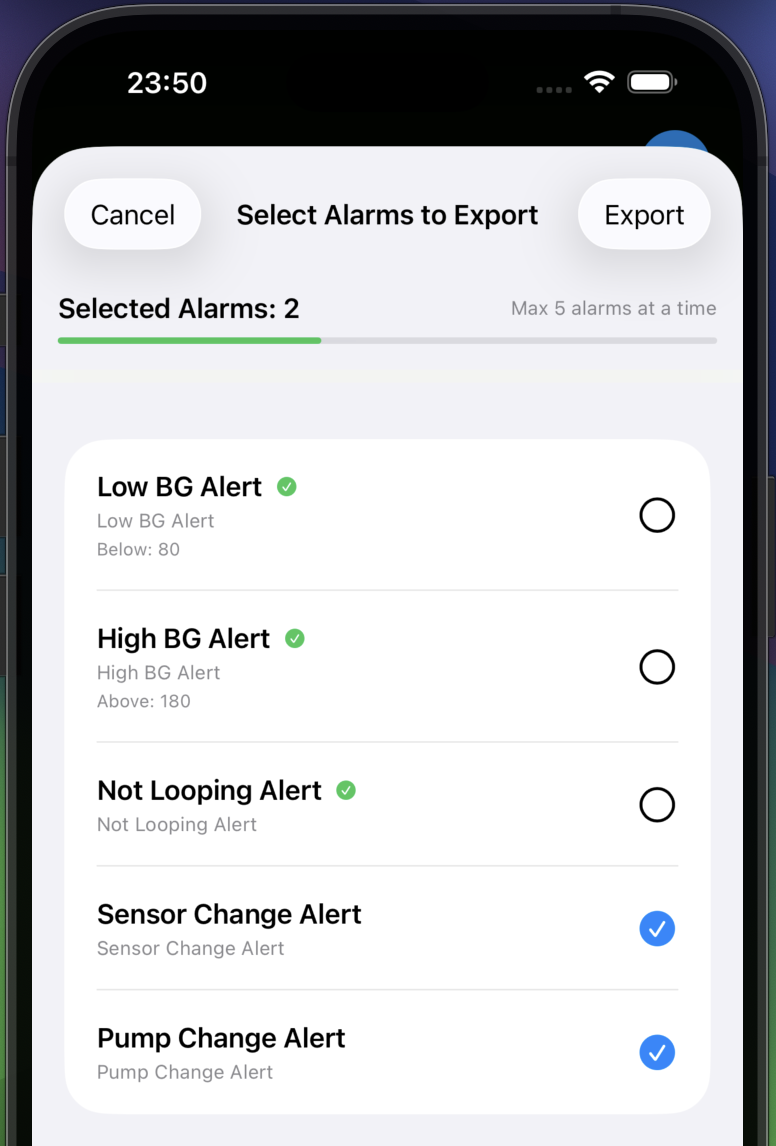
Export Alarm Settings will let you select up to 5 alarms at a time to export. If you re-enter the export screen after a successful export, it will mark the exported alarms so that you can export more alarms if needed
Import Settings
On the phone that will receive the settings from the QR code, choose the option: "Scan QR Code to Import Settings"
The first time you import settings with LoopFollow, you will be required to give permission to use the camera. Once permission is granted, hold the importing phone to view the QR code presented by the exporting phone.
When the QR code is accepted, you will see a screen indicating what type of settings is being imported. You will be warned that if you accept the import, your current settings will be overwritten.
Note the QR code for alarms may be slow to import. Just move the phone closer and further away until the code is accepted.

APN
You must create and enter Apple Push Notification (APN) credentials if you want to make use of several features offered by LoopFollow. If you choose not to use these features, no credentials are required.
Features which need APN:
- Live Activity
- Remote Control
Details about creating APN credentials are found in the Remote Control Overview
Live Activity
The Live Activity feature for LoopFollow has the following requirements or it will not update reliably and should not be used.
- Background Refresh must be enabled
- Typically caregivers use Silent Tunes to keep the app alive in the background
- If background refresh is not working, the app notifies the user and they should assume Live Activity is also not refreshing
- APN Credentials must be entered
- Live Activity must be enabled
Live Activity Options
The Live Activity screen allows the following selections:
- Enable Live Activity (slider)
- Restart Live Activity (manual button if needed)
- Grid Slots for Live Activity
- There are 4 slots available
- There are over 20 options to choose from for the 4 slots
- The options are the same as are found in the Information Display
Remote
Detailed instructions for configuring a phone for remote control are found on the Remote Control Overview page.
If you are configuring a second device and already have one device configured for remote control, be sure to review:
Alarms
The Alarms settings allow you to control the behavior of all active alarms. Individual alarms are selected and configured with the Alarms Feature.
- One nice feature you may want to enable is the Volume Buttons Snooze Alarms option.

Calendar
The calendar entry used to update on the watch in real time, but with iOS 18, the update rate has been throttled. It is still useful for Carplay.
Contact
The Contact image trick added with v2.2.8 currently works to provide real-time updates on an Apple Watch.
For more detailed instructions, see Real-Time Watch Updates using Contact
Advanced
Allows you to choose what information to download from Nightscout and to modify your graph
- Download Treatments
- Download Prediction
- Graph Basal
- Graph Bolus
- Graph Carbs
- Graph Other Treatments
- BG Update Delay
- Logging options (turn on debug option)
Logging
LoopFollow logs activity to a file that can be viewed within the app, and can be shared via email, a Notes file or Facebook messenger if needed. The log can be filtered and searched. This will aid in troubleshooting and diagnostics.
Normally, the debug log option is disabled. The log debug option is found in the Advanced section. If the logs seem verbose, check that setting.
View Log
When you select View Log, you see the entire log but can also filter for particular types of activities.
Share Logs
When you choose Share Logs, you can send the log to device or app of your choice.
The log is named LoopFollow YYYY-MM-DD.
Build Information
This section reports the Version you are using, indicates the Latest Version. In addition, it reports when this app will expire, when it was built and provides details of the branch name and commit identifier.